

This article was last updated on Jun 10, 2024 to add new section for tsconfig.json and add some tips on usage with Next.js
Introduction
Next.js is an open source React framework for building single-page web applications. It comes with numerous out-of-the-box functionalities that make developing web applications faster and more interesting, thereby providing refined and elegant developer and user experiences.
Combining Next.js and TypeScript gives us superpowers to rapidly create applications with a good developer and user experiences. Every developer hates bugs. Especially pesky ones such as typos or trying to use or access undeclared variables. TypeScript helps catch these types of bugs early during development, and this is one of the many features that make integrating it with a tool like Next.js fantastic.
In this article, we'll look at how you can integrate TypeScript in your Next.js apps. We'll also explore reasons why you should consider using this tool in your Next.js projects and also talk about its benefits.
Steps we'll cover:
- What is TypeScript?
- How to add TypeScript to your Next.js app
- How to use Typescript in Next.js API routes
- Disabling Typescript Errors in Production
What is TypeScript?
It's a strict JavaScript superset used for large enterprise projects and writing programs that scale. In the end, TypeScript transpiles to plain JavaScript and can be used for developing applications on the client-side and server-side.
TypeScript is an object-oriented programming language that provides all JavaScript features and extra useful capabilities. These capabilities include static or dynamic type checking, error checking during compilation, type inference, and so on.
How to add TypeScript to your Next.js app
Next.js provides integrated support for TypeScript with built-in types for pages, API routes, the three data fetching methods, etc.
Basically, there are two ways in which we can add TypeScript to our project. The first is with create-next-app, and the second is by adding TypeScript manually to an existing project.
create-next-app
We can bootstrap a Next.js application with TypeScript by adding a --typescript or --ts flag to the create-next-app command like below:
npx create-next-app@latest --ts
# or
npx create-next-app@latest --typescript
Adding TypeScript to an existing project
Alternatively, we can also add TypeScript manually to an existing Next.js project.
First, you'll need to create a tsconfig.json file in your project root folder. This file specifies the root files and the compiler options required to compile the project and is populated automatically by Next.js with default values.
touch tsconfig.json
Next, run npm run dev or yarn dev (if you use Yarn) to start the application development server.
Next.js will emit a message in the terminal with the following content and try to install the necessary TypeScript related packages:
It looks like you're trying to use TypeScript but do not have the required package(s) installed.
Installing dependencies

If you are not trying to use TypeScript, please remove the tsconfig.json file from your package root (and any TypeScript files in your pages directory).


Installing devDependencies (yarn):
- typescript
- @types/react
- @types/node

[1/4] Resolving packages...
[2/4] Fetching packages...
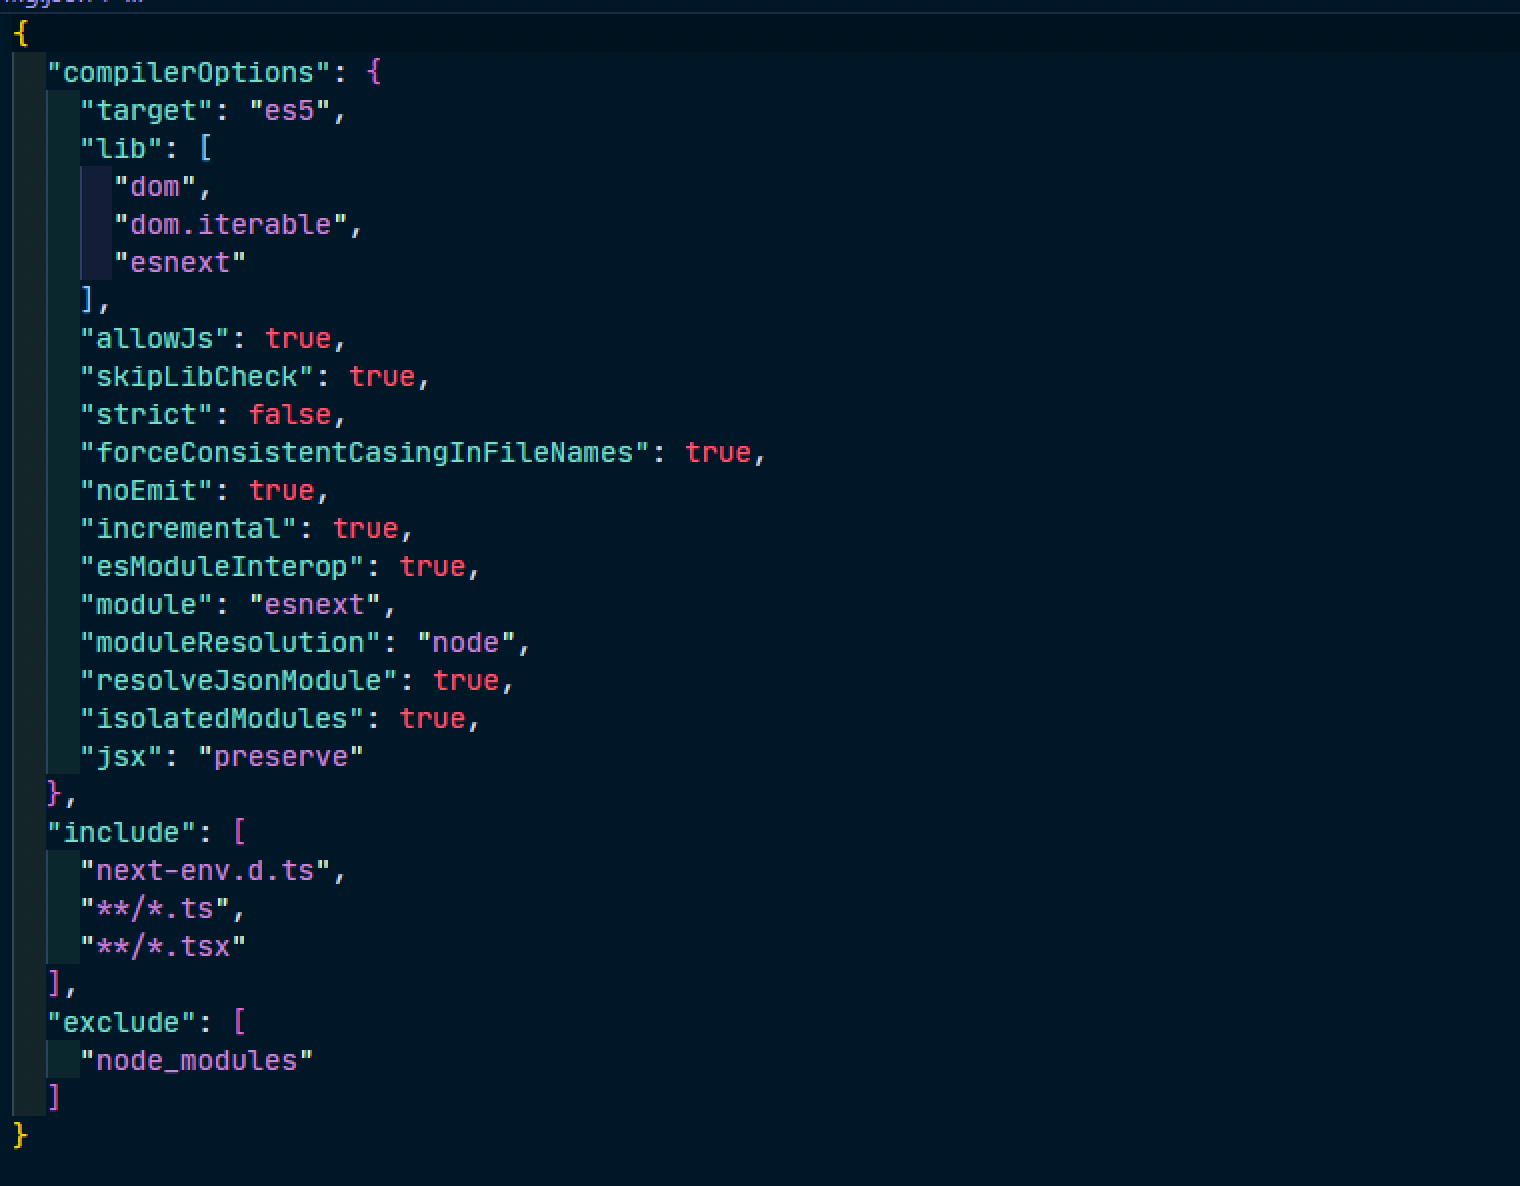
When the installation is complete, open tsconfig.json and you'll see it populated with values like below:
If you noticed, Next.js also created a new file, next-env.d.ts in the project root. This file ensures Next.js types are picked up by the compiler and should not be edited or deleted. Also, ensure the file is added to .gitignore to prevent it from being committed by version control like Git.
With this, you can now start creating files with .ts and .tsx extensions in your application.
Usage example
import React from "react";

type ProfileProps = {
  profile: {
    firstName: string;
    lastName: string;
    age: number;
  };
};

const Profile: React.FunctionComponent<ProfileProps> = ({
  profile,
}): JSX.Element => {
  return (
    <>
      <p>Profile</p>
      <div>Welcome, {profile.firstName}</div>
    </>
  );
};

export default Profile;
Understanding tsconfig.json in Typescript
The tsconfig.json is the main piece of configuration for TypeScript. This file contains all the compiler options and settings for the TypeScript compiler to know exactly how you want your code transpiled. Here's a structure, which the typical tsconfig.json should have:
Compiler Options
-
target: It points to the version of JavaScript that the TypeScript code compiles into. Standard settings are "es5" and "es6".
"target": "es5"
lib: This specifies the list of library files to include in the compilation. Most of the time, this will be "dom," "dom. iterable", and "next" together for a web project.
"lib": ["dom", "dom.iterable", "esnext"]
allowJs: Allows JavaScript file compilation. This may be helpful in introducing TypeScript gradually into an existing JavaScript codebase.
"allowJs": true
skipLibCheck: This will avoid the checking of declaration files (.d.ts) and would consequently help in faster compiling.
"skipLibCheck": true
strict: Enable strict option checking. This option, if true, will enable strict rules by which your code will become more resilient.
"strict": false
forceConsistentCasingInFileNames: Ensures that filenames are consistently cased const.
"forceConsistentCasingInFileNames": true
noEmit: The output files are not emitted by the compiler. This is a pretty useful option for projects where we are only concerned with type checking and do not want to take a look at the final JavaScript file.
"noEmit": true
esModuleInterop: This sets up interoperability between CommonJS and ES Modules; thus, one can import files in CommonJS format with the ES Module syntax.
"esModuleInterop": true
module: Defines how the module code should be generated. The most common values, appropriate for modern projects, are these, which includeesnext.
"module": "esnext"
-
moduleResolution: Defines module resolution strategy: The preferred value for a Node.js application is "node."
"moduleResolution": "node"
resolveJsonModule: Enables import for JSON modules in some scenarios, e.g., while working with the configuration file or in a different manner.
"resolveJsonModule": true
isolatedModules: Treat each file as a standalone module. This is likely to help in making the build faster. ```json
"isolatedModules": true
-
jsx: Code generation method of the JSX. When set topreserve, JSX is kept as is and not rounded on Next.js to handle it.
"jsx": "preserve"
- Include and Exclude
include: Specifies the files or directories to include in the compilation. Typically, this includesnext-env.d.tsand all.tsand.tsxfiles."include": ["next-env.d.ts", "**/*.ts", "**/*.tsx"]exclude: Specifies the files or directories to exclude from the compilation. This typically includesnode_modulesto avoid unnecessary type checking of external libraries."exclude": ["node_modules"]
How to use Typescript with Next.js data fetching methods
Next.js comes with built-in types for all its three data fetching methods (getStaticProps, getServerSideProps, and getStaticPaths).
Here's how to use them in your code:
import { GetStaticProps, GetStaticPaths, GetServerSideProps } from "next";

export const getStaticProps: GetStaticProps = async (context) => {};

export const getStaticPaths: GetStaticPaths = async () => {};

export const getServerSideProps: GetServerSideProps = async (context) => {};
Next.js also provides built-in types to infer the types for props from getServerSideProps and getStaticProps.
If you want to get inferred typings for your props, you can use InferGetStaticPropsType<typeof getStaticProps> or InferGetServerSidePropsType<typeof getServerSideProps> in a page component.
Let's say we're expecting some data from an API that we need to pre-render at build time. Instead of writing repetitive code like the below:
type PostProps= {
    userId: number,
    id: number,
    title: string,
    body: string
  }

export const getStaticProps = async () => {
      const response = await fetch('https://jsonplaceholder.typicode.com/posts');
      const posts: PostProps[] = await response.json();

    return {
      props: {
        posts,
      },
    }
  }

function PostPage({ posts }: { posts: PostProps }) {
    ...
  }

export default PostPage;
We can use InferGetStaticPropsType to get inferred typings for the posts prop. Add and refactor the code with the highlighted like below:
import { InferGetStaticPropsType } from 'next'

...

function PostPage({ posts }: InferGetStaticPropsType<typeof getStaticProps>) {}

export default PostPage
You can also use this same method when using getServerSideProps.
How to use Typescript in Next.js API routes
Next.js also comes with built-in types for API routes. which we can access like below:
import type { NextApiRequest, NextApiResponse } from "next";

export default (req: NextApiRequest, res: NextApiResponse) => {
  res.status(200).json({ age: "25" });
};
We can also specify custom types for the response data:
import type { NextApiRequest, NextApiResponse } from "next";

type Data = {
  name: string;
};

export default (req: NextApiRequest, res: NextApiResponse<Data>) => {
  res.status(200).json({ age: "25" });
};
How to configure absolute imports and module path aliases in tsconfig.json
Do you relate with the pain of having to do something like this?
Import { fetchUserProfile } from '../../../../utils'
Import UserProfile from '../../../UserProfile'
How about if you could do something like?
Import { fetchUserProfile } from '/@utils'
Import UserProfile from '@components/UserProfile'
Well, to achieve this, we can configure path aliases in tsconfig.json so we can conveniently import modules across our application. TypeScript path aliases allow us to create aliases or shortcuts for absolute paths in the application, which we can resolve to. Next.js also automatically supports path aliases, so we don't have to do many configurations.
For example, if you have a file in your project importing a module with a path structure like /components/MUIComponents/ButtonGroup/, instead of trying to write an ugly code such as this:
import React from "react";
import ButtonGroup from import ButtonGroup from "../../components/MUIComponents/ButtonGroup";

const User = () => {
  return (
    <>
      <h1>User Page</h1>
      <div>
        <ButtonGroup />
      </div>
    </>
  );
};

export default User;
We can create a path alias for all files in the MUIComponents folder for easy access using the baseUrl and path options in tsconfig.json like so:
...
"baseUrl": ".",
"paths": {
    "@/MUIComponents/*": ["components/MUIComponents/*"]
},
...
baseUrl lets us specify a root URL to use for our imports and paths lets us configure path aliases. You can read more about module path aliases here.
You can use a jsconfig.json file instead if you're not using TypeScript in your project.
Now we can use the alias in our application like so:
import ButtonGroup from "@/MUIComponents/ButtonGroup";

const User = () => {
  return (
    <>
      <h1>User Page</h1>
      <div>
        <ButtonGroup />
      </div>
    </>
  );
};

export default User;
This looks way better and straightforward.

Disabling Typescript Errors in Production
If you happen to have TypeScript errors while running next build, Next.js will fail the build but you can disable the type checks if you wish.
To disable the type checking step, enable the ignoreBuildErrors option in next.config.js like so:
module.exports = {
  typescript: {
    // !! WARN !!
    // Dangerously allow production builds to successfully complete even if
    // your project has type errors.
    // !! WARN !!
    ignoreBuildErrors: true,
  },
};
Make sure you really know what you're doing before using this option.
Common Next.js TypeScript Issues and Workarounds
Debug TypeScript Errors
When you run into a TypeScript error, the first thing you should do is read very carefully what the error message is telling you. Many times, it explains well what has gone wrong and where. Use this to pinpoint and fix issues in your code. Here are a few tips:
- Check Type Definitions: Ensure all your types are well defined and imported.
- Use Type Assertions: Use type assertions to tell TypeScript, "trust me, I know what I'm doing."
- Update Dependencies: Sometimes updating TypeScript or your type definitions (
@types/reactfor example) will make the errors go away.
Best practices of TypeScript using Next.js
Project Organization
A well-structured project allows you to actually manage and scale your application correctly. Here are some bunch of tips on how to structure your Next.js app using TypeScript:
Sorting Files by Attribute: When organizing the directories, group the files that relate to a given feature/module together. For example: elements, modules, and templates. This makes code management much easier and file retrieval more convenient.
/src
  /parts
  /pages
  /helpers
  /styles
  /services
Use a Common Naming Convention: Follow the file and folder naming convention. One such example is the naming of files in camelCase and React component names in PascalCase.
/components
  header.ts
  Profile.ts
Make it Human: Modularize your code by separation of concerns. Put your business logic in service files and keep your components' functionality focused on the presentation.
/services
  userService.ts
/parts
  UserProfile.tsx
Writing Clean, Maintainable Code
Clean and maintainable code ensures better readability and less technical debt. Here are some of the best practices for writing clean TypeScript code in Next.js:
Type Annotations
Types should be declared expressly when declaring function parameters, return values, and variables. This makes your code predictable and more accessible to follow.
const add = (a: number, b: number): number => {
  return a + b;
};
Do Not Use any
Do not use any at all. It is the same as not using TypeScript. Better to use some types or generics.
const fetchData = async (): Promise<User[]> => {
  // Fetch user data
};
Implement Interfaces and Types
Use interfaces and type aliases to write object shapes and function signatures. This will bring you higher reusability and readability in only one place within your code.
interface User {
  id: number;
  name: string;
  email: string;
}
Make Functions Small
The key is that the small functions become easily reusable, making it a breeze to test and maintain.
const calculateTotal = (prices: number[]): number => {
  return prices.reduce((total, price) => total + price, 0);
};
Conclusion
We covered how to get started with TypeScript in your Next.js applications. We also talked about the importance and benefits associated with combining TypeScript capabilities with Next.js for a faster and easier application development experience. We hope this article helps you consider integrating TypeScript and Next.js in your next applications.